• Skip to primary navigation
  • Skip to main content

Academic Outreach

Teach Online

QUICK LINKS: Professional Development
Grant | Find an ID | Staff
Hide Search
  • Upcoming
  • Teach Online
  • Survival Guide
  • Tutorials
    • Accessibility
    • Blackboard
    • Calendly
    • Panopto
    • Zoom
  • Instructor Showcase
  • Teaching Resources
    • Tech Tips and Resources
  • Technology & Tools
    • Tech Tips and Resources
  • Show Search

Blackboard

Rearranging Grade Center Columns

· Mar 21, 2023 ·

You can rearrange columns of assignments that appear in Full Grade Center.

  1. Go to Control Panel > Grade Center > Full Grade Center.
  2. Click the Manage button and select Column Organization from the drop-down menu.
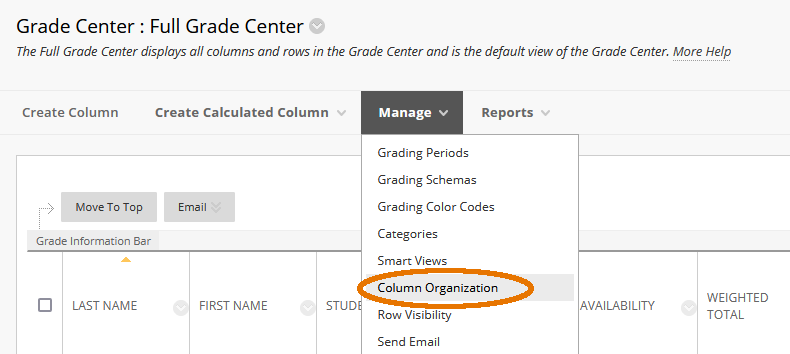
    Location of Column Organization on the menu
  3. Items listed from top to bottom in Column Organization correspond to the order they are displayed from left to right in the grade sheet in Full Grade Center.
    Click on the move icon in front of the name of an assignment. Drag & drop it into a new location. Alternatively, select an item and use the rearrange icon in the right-hand corner to move it up or down.
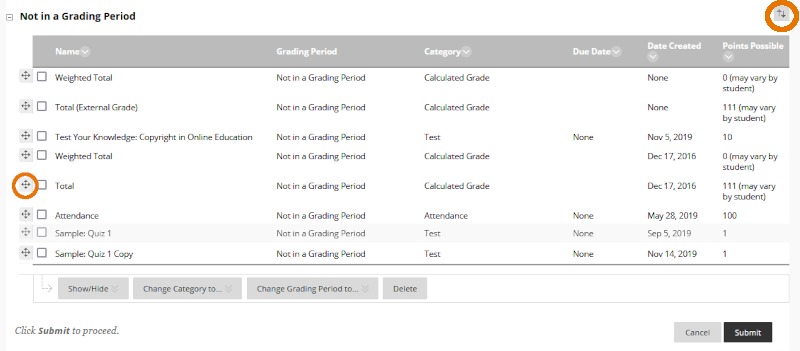
    The move iconNote: You must click and drag the move icon. You cannot move an assignment by clicking on the name.
  4. Drag & drop as many assignments as you’d like.
  5. Click the Submit button to save changes.
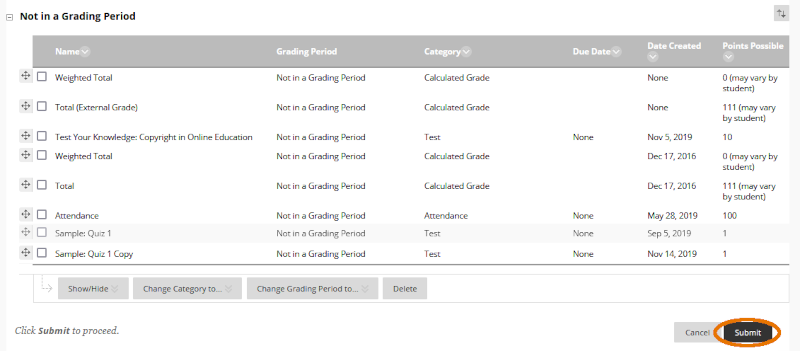
    Submit button

Creating Tests in Blackboard

· Feb 16, 2023 ·

One way to create a test is in the module or folder where you want the test to appear, and another way is to go through the Course Tools. 

Starting from a module or folder

        • Start from a module where you want to create the test.
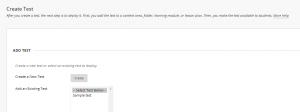
        • From inside the folder, click on Assessments. Then select Test.

        • You will be prompted to select Create test or to select a test you have created already.

        • Name the test.
        • Click Submit.

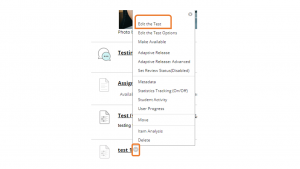
You can use this as a placeholder and return later to create questions, or start creating questions now. If you add questions at another time after creating the test, you’ll need to go to the drop-down arrow next to the test. Select Edit the test

pop up menu that appears after clicking on the arrow next to a test name. Edit the test is called out in an orange box

Blackboard Help Center offers more information about Question Types.

Starting from Course Tools

You can also create a test by going first to Course Tools, then selecting Test, Surveys, and Pools. Below is a video tutorial on the steps to create and deploy a test this way: 

To meet accessibility requirements

If you embed a video in your quiz, please ensure that it has captions. Please contact an instructional designer in Academic Outreach at teachonline@olemiss.edu for assistance with this.

If you use any images in your test or survey, they must have alt text provided for them. Alt text describes in words what the image displays if the image is relevant to the meaning of the test question. If an image is purely decorative, you do not need to provide alt text. For more help with alt text, see the link in “alt text” above or send an email to the above address. 

Copy a Blackboard Course

· Feb 15, 2023 ·

You may use Course Copy to transfer all course materials and settings from one Blackboard course to another. This process is useful for copying a sandbox or a previous semester course to a new course shell before updating necessary information. Watch the one-minute demo video or follow the steps below the video.

Before copying, make sure that you have enabled Blackboard through myOleMiss for your new course. Enabling Blackboard is not included in the demo video, but you can review the steps on the PDF quickstart guide.

Course Copy Steps

  1. Begin in the course you are copying from such as a sandbox or a previous semester course.
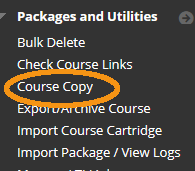
  2. Under Control Panel, expand Packages and Utilities and select Course Copy.
    Course Copy menu
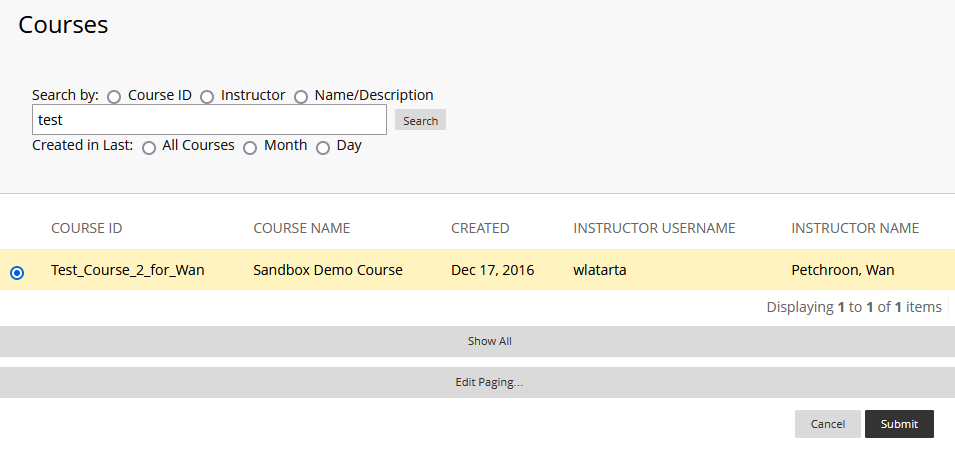
  3. Click Browse and select the destination course you are copying into. Select the course to copy into
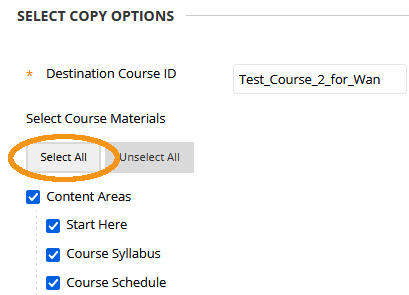
  4. Click Select All for course materials to make sure everything will be copied, including quiz questions and settings for all items in the course and the grade center.
    Select All button
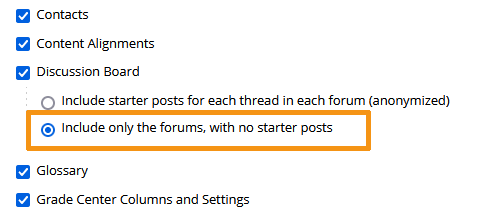
  5. For Discussion Board, select the second option, include only the forums with no starter posts. Option to include only the forums, with no starter posts
  6. Scroll down and click Submit. You will receive an email when the process is complete.

Enter the destination course to review copied materials. Drag and drop to rearrange course menus and delete unused menu items as needed.

Rename, Rearrange, and Hide Menu Links in Blackboard

· Jan 13, 2023 ·

You can rename, rearrange, and hide or delete links in the Blackboard course menu. Watch the short demo video or follow the steps written below.

Rename a course menu link

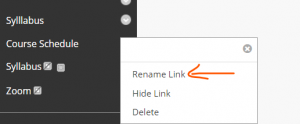
In you course, select from the course menu on the left-hand side the link you want to rename. Click on the drop-down arrow to the right of it.

When the menu pops up, you can then select one of the option: rename, hide, or delete. Click on Rename Link.

To rename a link, enter the new name in the white box. When you are done, click on the green check mark next to the white box. You can click on the red x to cancel.

Rearrange a course menu link

To rearrange a course menu link, hover your mouse over the link’s name. A small white rectangle with up/down arrows will appear to the left of that item. Move the mouse to the left, and the indicator with four directional arrows will appear. Click on that and drag the link to where you’d like it. (There is no photo for this step. Please see the video).

Hide a menu link

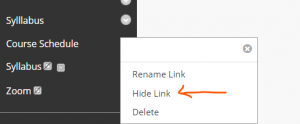
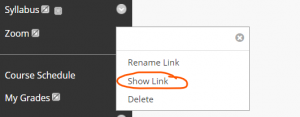
To hide a menu link, click on drop-down arrow next to the link you want to hide. You will also see Delete, but please keep in mind that deleting is permanent. We recommend that you select Hide unless you are certain you will not need this link in the future.

Once you have hidden a link, if you would like to show it again, you can do that by following the same steps above, but then Show Link will be the option instead of Hide Link.

Adjust Dates in One Place on Blackboard

· Dec 9, 2022 ·

Do you know you can adjust visibility and due dates of your course folders and assignments – in one place and all at once? Date Management is the Blackboard tool you need when you copy a course from a previous semester. Watch the one-minute demo video or follow the steps below.

1. Find the Tool

Under Control Panel, expand Course Tools and click on Date Management.

2. Select “List All Dates for Review”

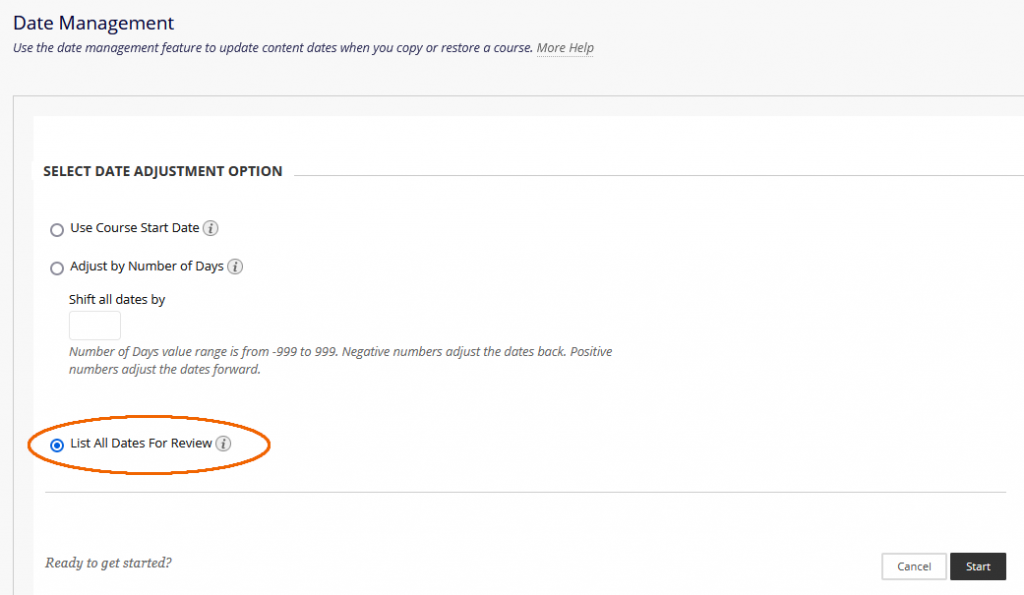
Select List All Dates for Review and click Start. This option allows you to review all existing dates, then adjust accordingly. Click Next when the process completes.

Date Management options
List All Dates for Review

3. Review and Adjust Dates

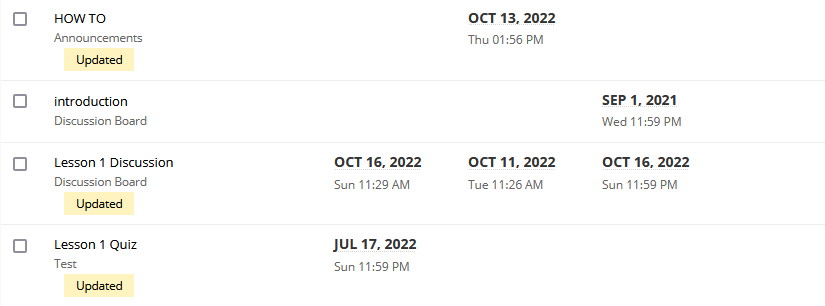
Adjust one item at a time

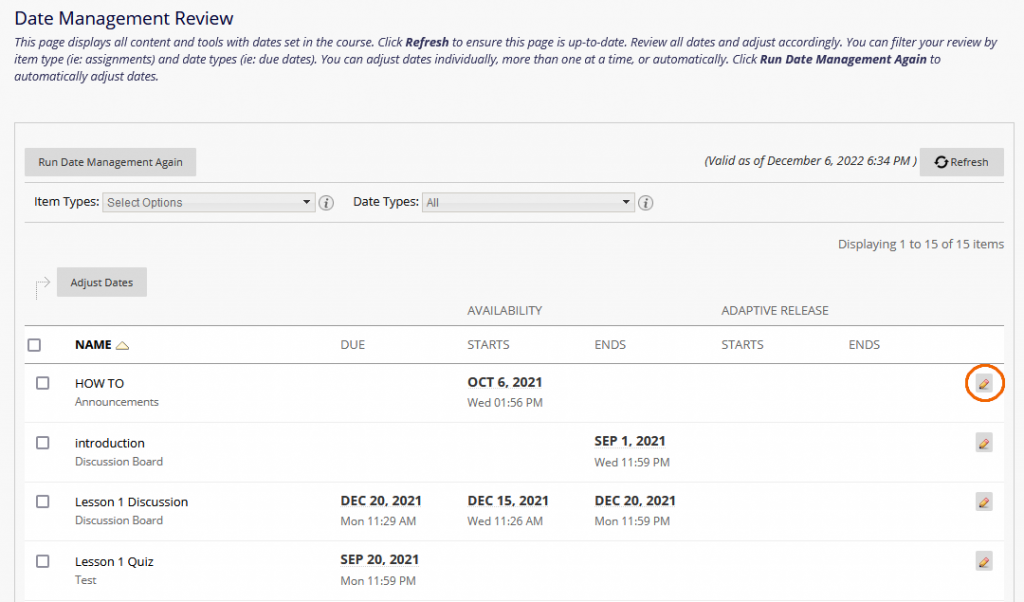
  • Click the pencil or edit icon to change the date for an item.
screen shot of edit icon
Click the Edit icon
  • Select a new date from the calendar and click Done to confirm.
  • Important: Click the green check to save the new date. You will see the “Updated” message confirming that the date has been adjusted.
screen shot of the green check icon
Click the green check icon to save the new date

Adjust multiple items at once

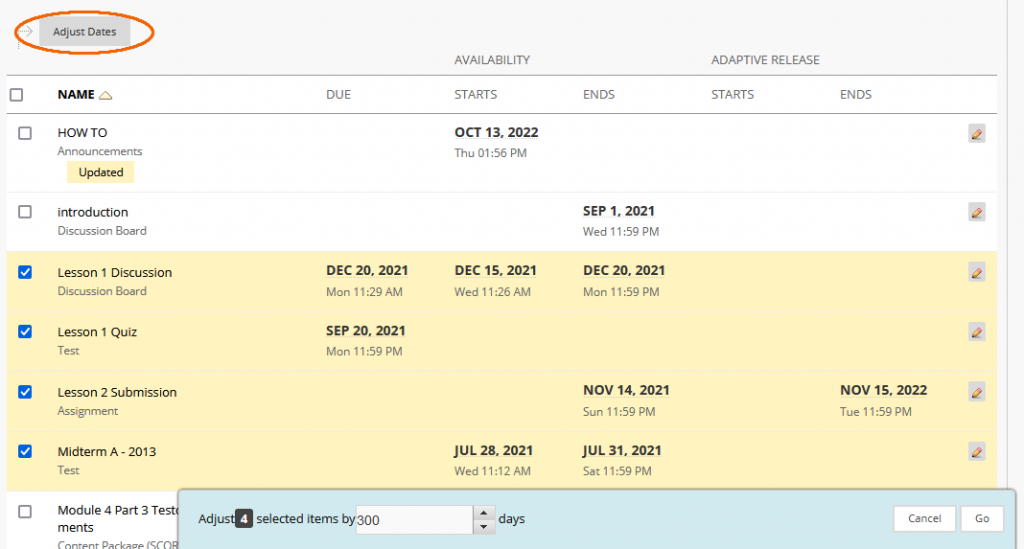
  • Select multiple or all items on the list and click on Adjust Dates.
screen shot displaying selected items
Adjust dates for multiple items
  • In the panel that opens at the bottom of the page, enter number of days to move the dates. A negative number moves the dates back. Click Go to save the new dates.
  • The “Updated” message confirms that dates have been adjusted.
screen shot for updated items
Dates have been updated

What if an Assignment is not Listed?

An assignment or a content folder may be excluded from the list if a date has not been set for that particular assignment or folder.

Please note that the Date Management tool can only adjust existing dates in the course. To add dates,  go to the content area and edit a folder or an assignment.

Can Blackboard Adjust all Dates Automatically?

Yes! Blackboard can automatically adjust all dates for you. Be mindful if you are adjusting dates from Fall to Spring, or adjusting dates for courses that start on the different days of the week. Further review may be needed. There are two auto-adjust options.

Use Course Start Date

If your previous course has a course start date, enter a new course start date to have Blackboard automatically adjust all the dates for you.

Example: The original course started September 1 with an assignment due September 26, which is 25 days after the start date. If you adjust the new start date to January 12, the assignment is now due February 6, which is 25 days after the new start date.

Adjust by Number of Days

Use this option when you know exactly how many days you want to adjust dates by. Blackboard will automatically adjust dates based the dates that are currently set for each item in the course, not today’s date.

Example: If you adjust dates by 30 days, the assignment that was due September 1 is now due October 1.

PDF Guide: Adjust Dates on Blackboard

Academic Outreach Online Course Template Instructions

· Dec 2, 2022 ·

Academic Outreach provides a course template for professors to organize online courses in a way that is helpful to students. You can download and import a copy of the Academic Outreach (AO) template into your Blackboard course. Instructions for how to do this are below.

Prepare

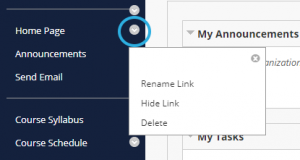
    • For a clean implementation, we recommend deleting the course menus in your Blackboard course where you would like to use the template prior to importing it. Alternatively, you may choose to rearrange, delete or hide some of the menus after the import. Course menus from the AO template will appear underneath the current menus.
    • To delete course menus, click on the drop-down arrow next to each menu item and select Delete. To hide menu items, select Hide Link.

course menu showing sub menu to rename link, hide link, or delete

Delete a course menu

Download

    • Download the zip file from Box and save it to your computer.
    • Do not unzip the file.
    • Click “Download” in the top right corner and the zip file will save to your computer.

Import

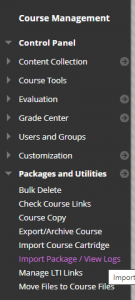
    • Go to your course where you want to upload the template.  In your new, empty course, navigate to Control Panel> Packages and Utilities> Import Package/View Logs.

Course management menu. Control panel and Packages and Utilities is in bold white text. Import packages/ View Logs is in purple text.
Select Import Package/View Logs

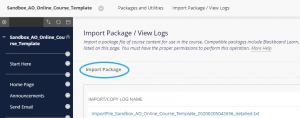
    • Click on the Import Package button.

Import Package/ View logs menu. Import package button is circled
Import Package button

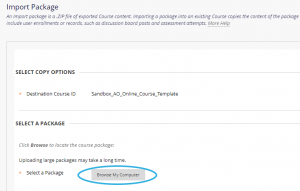
    • Click Browse My Computer for the zip file you previously downloaded.

Import Package menu. Browse my computer button is circled
Browse My Computer button

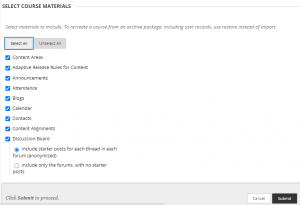
    • Select course materials to include by clicking Select All, then Submit.

      Select course materials options. Select all is highlighted. All boxes are selected. Submit button is on the bottom right.
      Select all and Submit

In a few minutes you will receive an email notifying you that the process is complete. However, if you do not see the template copied to the new course, please wait another half hour or so before contacting Blackboard Support (blackboard@olemiss.edu).

pdf version of these instructions

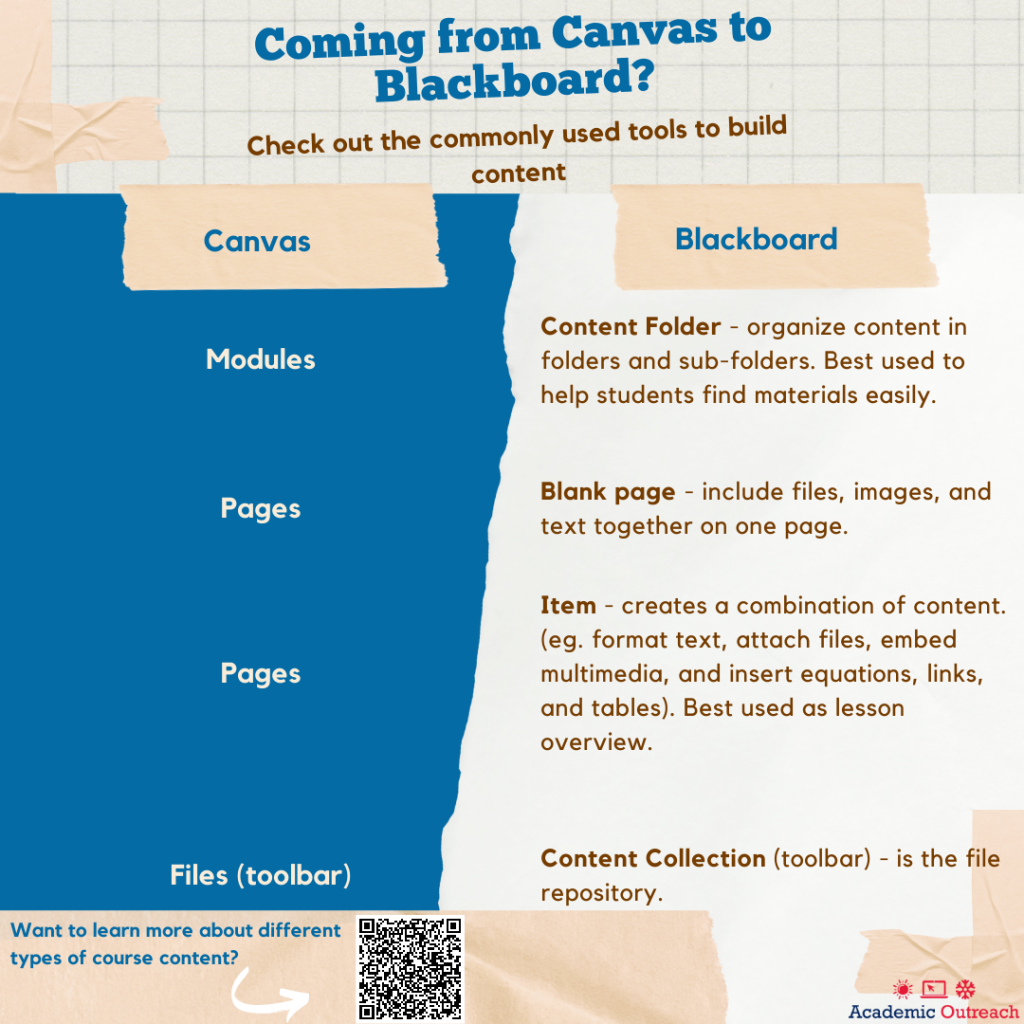
Coming from Canvas to Blackboard?

· Nov 1, 2022 ·

Canvas to Blackboard course build tool comparison Check out the commonly used tools to build content In Canvas its Modules In Blackboard its content folder organize content in folders and sub-folders. Best used to help students find materials easily In Canvas its Modules In Blackboard its blank page It includes files, images, and text together on one page In Canvas its Pages in Blackboard its item. It creates a combination of content eg. format text, attach files, embed multimedia, and insert equations, links and tables. Best used as lesson overview In Canvas its files in Blackboard its content collection is the file repository

The University of Mississippi logo
EEO Statement Give Us Your Feedback Accessibility Ethics Line UM Creed
Copyright © 2025 The University of Mississippi. All Rights Reserved.